
Mass Renew Academic Contract
Update coming soon.
Mass E-Docs are intended for Initiators to perform the same transaction for several employees on one document rather than a separate document for each individual employee. An example of that is renewing several academic contracts on one document. Rather than doing individual Renew Contract for each one, the initiator would use the Mass Renew Contract to renew them all on one document. Typically, this is used for large numbers.
1. Once you are in the HRMS Portal, click on Mass Renew Contract. Enter search criteria based on the following instructions.
1a. Search by Position Number.
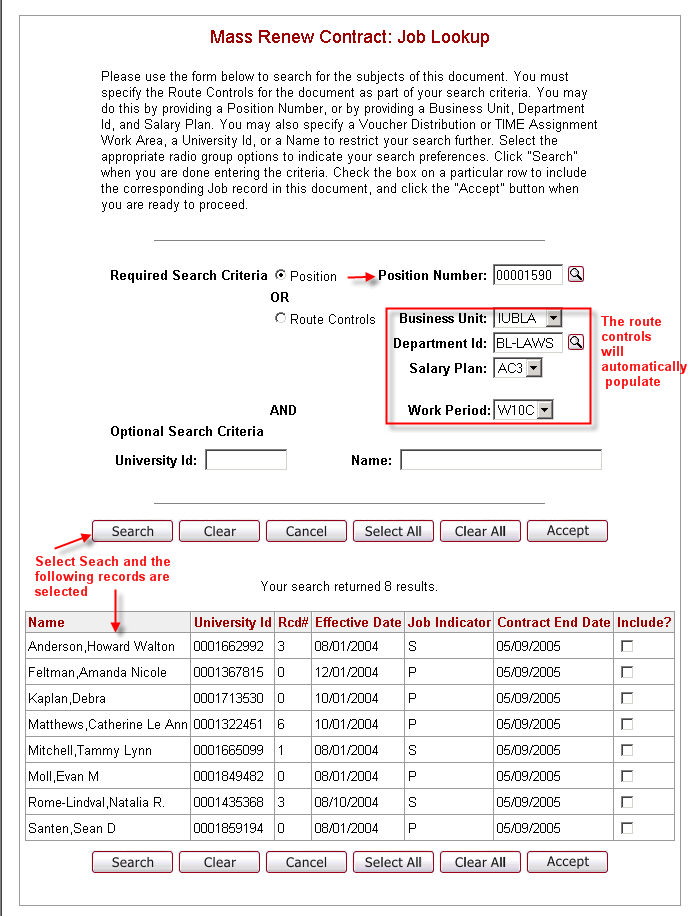
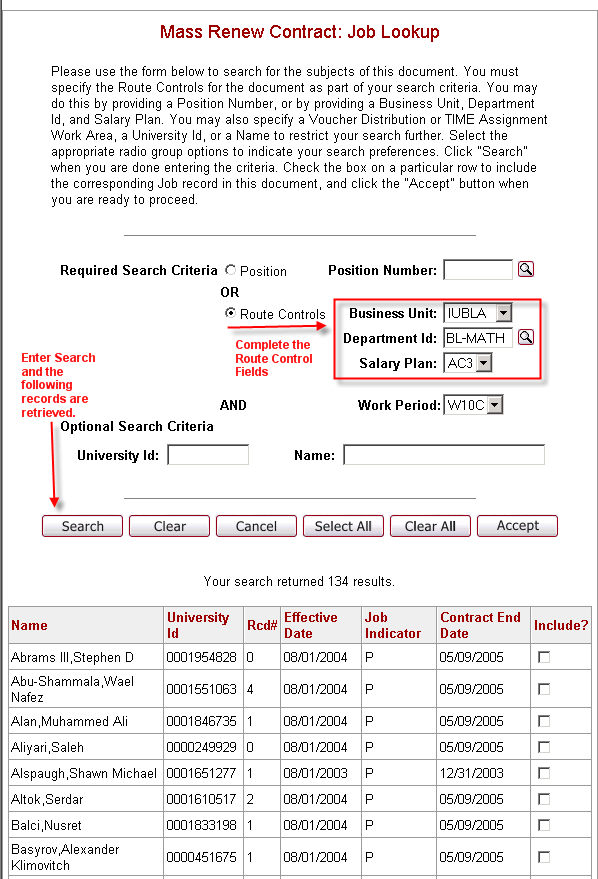
1b. OR you can search by Route Controls if you do not know the Position Number. This search will return everyone in your department or you may specify a specific salary plan
TIP: The preferred way to search for Mass Renew Contracts is by Position Number. When you do the search by Position Number, it will bring back a maximum of 300 records. If you have more than 300 incumbents in a position, you can also put a letter in the name box which will bring back everyone with a name beginning with that letter.
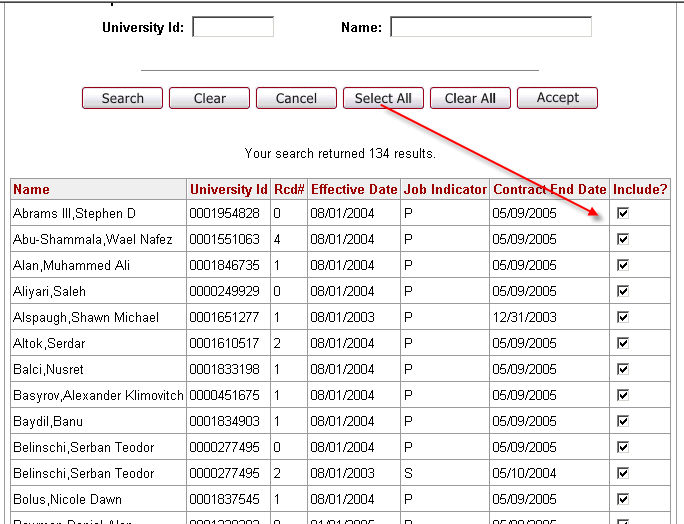
2. After the search results are displayed, there are two options to selecting the records.
2a. You may click the Select All button which will result in all of the records being selected.
NOTE: Only 50 records can be selected at a time. If more than 50 records are returned, you will need to narrow your selection to 50 records before proceeding. If you fail to choose only 50 records, a warning message will appear telling you to select only 50. If this process is overlooked and the document has not been fully routed, all University ID numbers will be locked until the next day. If you want to continue with the remaining employees, you will need to manually record the 51st record as a starting point.
2b. OR you may select individual records as shown in the example below.
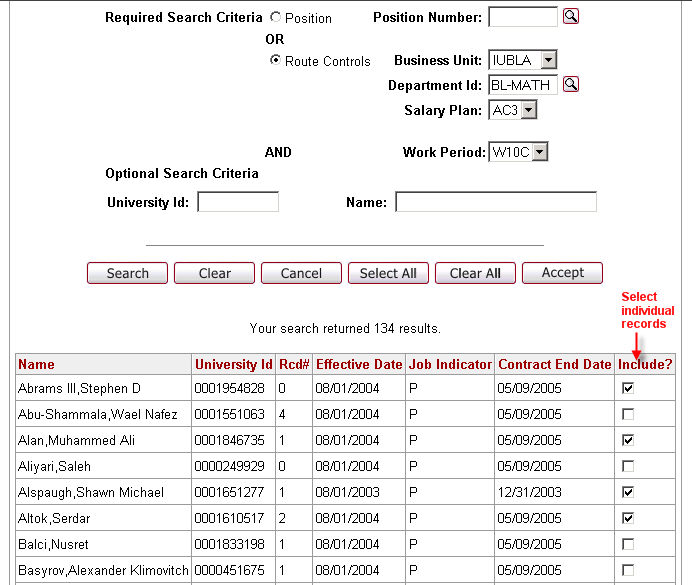
3. Select the Accept button and the Job Records page will appear.
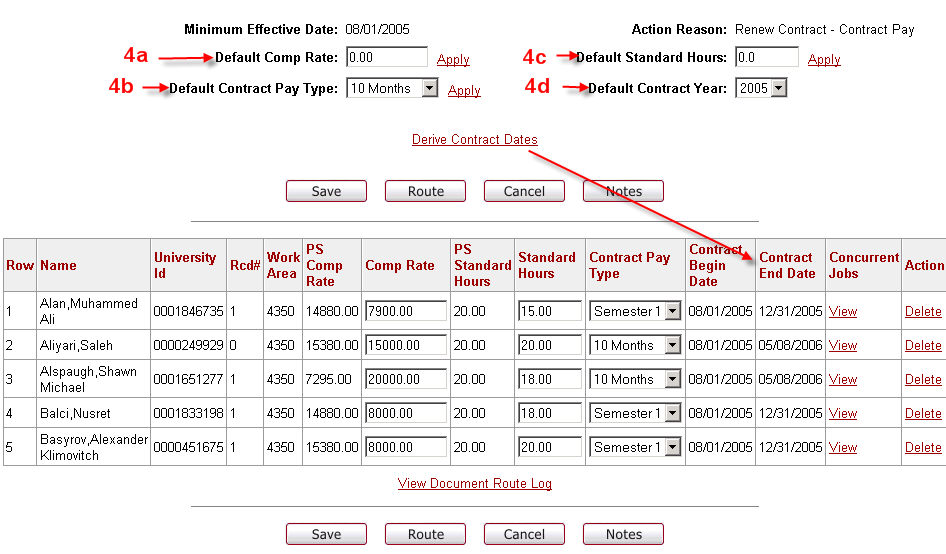
4. Complete the Job Records page as described below.
4a. Enter the Comp Rate by using the Default Comp Rate, click Apply and the rate will be applied to all selected records. Then you can do individual comp rate changes by entering the comp rate in the window. If you prefer, you can enter the comp rate individually instead of using the Default Comp Rate.
4b. Enter the Contract Pay Type by using the Default Contract Pay Type, click Apply and the Pay Type will be applied to all selected records. Then you can do individual changes to individual records if the default does not apply.
4c. Enter the Standard Hours by using the Default Standard Hours, click Apply and the hours will be applied to all selected records. If you prefer, you can enter the standard hours for each individual record.
4d. Choose the Default Contract Year from the drop down. Then click on “Derive Contract Dates.” The following screen will appear. If someone will only be working for the first semester, you are able to choose Semester 1 in the Contract Pay Type. After choosing Semester 1, you will have to click on “Derive Contract Dates” again. The following screen will appear after the contract end date is changed.
5. When completed, select one of the Routing buttons:

SAVE = this action Saves to your Action List in order for you to retrieve it at a later time to complete it.
ROUTE = select when you have completed the E-Doc and are ready to automatically route the document where it will be approved and eventually saved to PeopleSoft.
CANCEL = cancels the entire E-Doc. It will be necessary to begin over.
NOTES = initiators and approvers can add notes to the electronic document as it is being routed through the approval process. Notes should be used for providing details about the transaction being routed. Notes are only available to initiators and users who are part of the routing process. They are not saved in PeopleSoft but are stored within the E-doc database.
6. After selecting Route, complete the transaction by selecting one of the following buttons:

Cancel - Takes you back to the previous screen
Annotate - Annotate should be used for information related to processing of the E-doc. This field is helpful for approvers to prioritize activities, especially for those with large action lists. Annotations are available for viewing in the route log that is accessible during document search and on the action list. Due to the fact that route logs are available to all users through the document search, confidential information should not be entered in this field. Some examples of phrases that may appear in the annotation:
- Urgent
- Disapproved
Print - will print the records. WARNING! If you use this button, each selected record will print several pages. Use the Print Icon on your browser toolbar instead.
7. Click Confirm and you will be notified that you have routed the E-Doc successfully.
8. Click Close