
Hire AC1 Academic Employee
Update coming soon.
Business Process Overview
Step By Step
Step 1:
- The department has a defined, approved vacant budgeted position.
- Recruitment steps have been completed and the department has an accepted offer.
Step 2:
- The department searches to determine if the employee is a new hire.
- The department has initiated an electronic document (E-Doc) to Add New Person, and received the university id to complete the hire.
- The department routes all supporting documents, e.g., Personal Profile Form (ED) minimum requirement for hire and Personal Profile Form (PS), and Personal Profile Form (PSA), and I-9, if available at the time of hire.
Step 3:
- The Hire E-Doc will route for approval.
- The Central Office will provide final approval, and complete the save to HRMS.
Glossary Terms
- SSN = National ID
- Campus = SetID
- FTE = Standard Hours
- Start/Stop Dates = Effective Date of Action
- Object Code 2000 = Salary Plan AC1
- Job = Salary Grade
- Rank/Title = Administrative Post
- Base Months M1 (12 pay) = Work Period - W
- Base Months M2 (10 pay) = Work Period - W10
- Pay cycle M1 = Pay Group A12
- Pay cycle M2 = Pay Group A10
- Pay cycle M1 = Compensation Frequency M
- Pay cycle M2 = Compensation Frequency M10
- Group of screens = Component
- A screen = Page
Key Information
- The following is key information you should know about Hiring an AC1 Academic Employee
- Any field marked with an * requires a value.
- Review guidelines for appointing academic administrators.
- If Work Period = W then Pay Group = A12, and Compensation Frequency = M
- If Work Period = W10 then Pay Group = A10, and Compensation Frequency = M10
- If the employee will hold more than one title, make sure that all titles are included on the eDoc.
- If at any time you need to cancel the E-Doc you are processing, DO NOT click the “X” on the upper right corner of the document. Clicking the “X” will create subject locking on the employee and/or position id. Always use the button to cancel an E-Doc.
- Do not use the browser back arrow to move to a previous page, this will create subject locking on the employee and/or position id.
Instructions
1. In One.IU navigate to the eDocs tab in the HRMS Portal, click Hire Employee
Based on the employee information that you have, select the ID type from the drop down menu and click on it. If this is a new person to the university, you must complete the Add Person E-Doc.
Campus ID - a number assigned to students upon admission - either their national ID or a selected number
National ID - Social Security number
University ID - PeopleSoft generated 10-digit number
Name & Birthdate - first and last name of person and birthdate

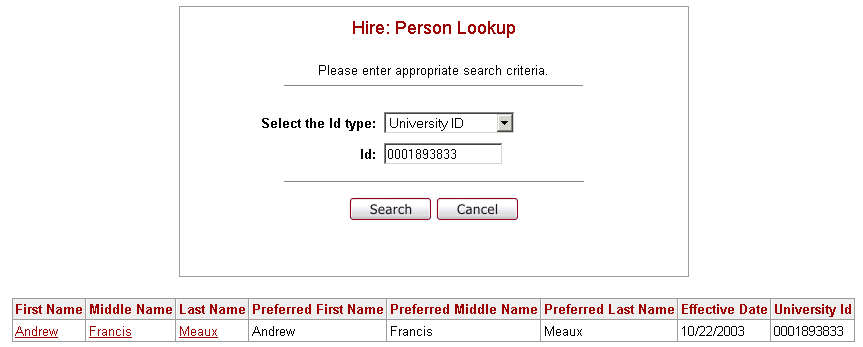
2. Enter the number in the ID field, click Search, and any record that met the search criteria will appear.
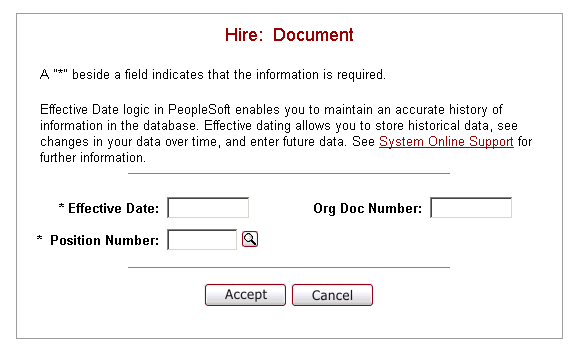
3. Click on the record and the following screen will appear. Enter the Effective Date of the hire (the first day employed). Enter the position number the person is being hired into (using the lookup as needed - see example below), and click Accept.
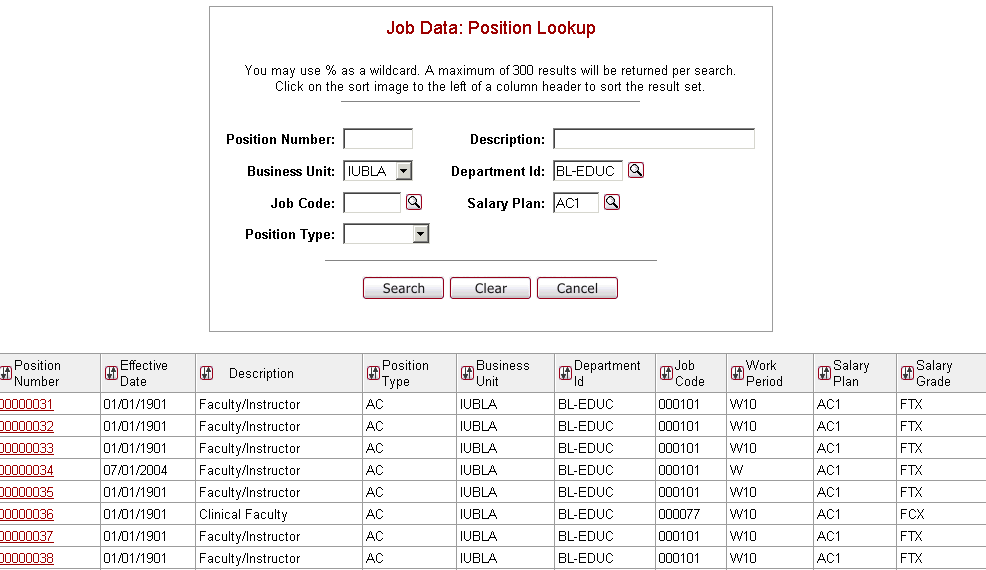
4. The following is an example of a Position Lookup screen. Enter as much information as you have to narrow your search. After entering the information, select Search and a list of positions will be displayed.
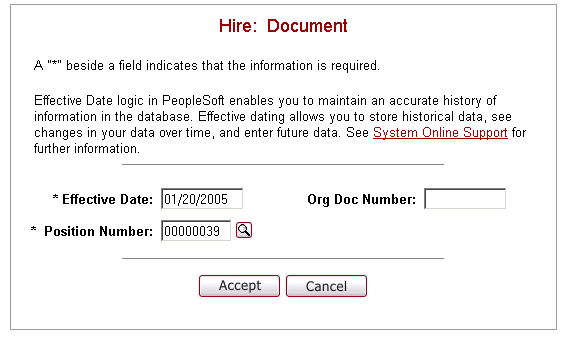
5. Click on the correct position number and it will automatically populate the previous position screen. Enter the effective date.
6. Select Accept.
NOTE: If the validation check verifies that there is no Gender or Ethnic Group for the person you are attempting to hire, the following message will appear.
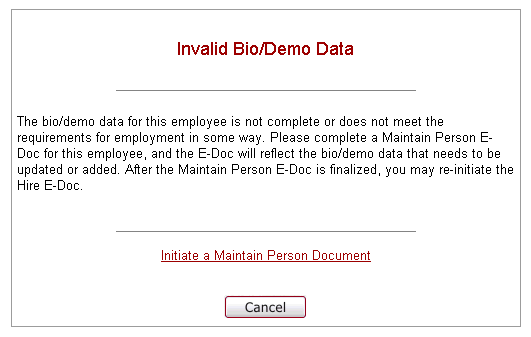
Go here for instructions: Bio/Demo Validation for Hires
If there is no message, proceed with step 7.
7. Click Accept and the Action Reason screen will appear. Select Hire (HIR), (or Additional Pay Only if it is one).
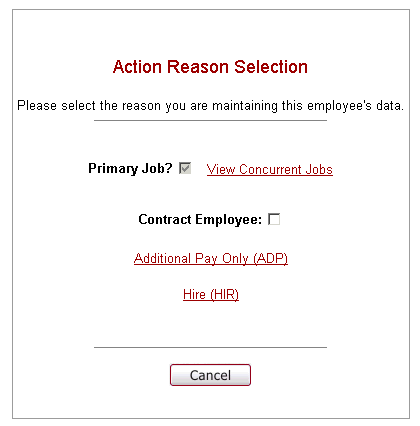
Since this will be an AC1 employee, you will NOT check the contract employee box.
Primary Job? HRMS requires that an employee have exactly one Primary job at any given date during employment. Payroll and Benefits are both heavily reliant on this field and invalid choices can result in benefit program termination. As such, Edoc logic is built to avoid common error situations.
To see whether an employee has another job, you can select the View Concurrent Jobs link.
Administrative Appointments
Administrative appointments will not be viewed as multiple job situations. When an employee assumes the role of Chancellor (AAE), Vice Chancellor (AAF), Associate Vice Chancellor (AAG), Assistant Vice Chancellor (AAH), Dean (AAI), Associate Dean (AAJ), or Assistant Dean (AAK), they will be assigned the appropriate salary grade for the administrative job, and their professorial role will be captured through title in the Administrative Post.
If the employee is assuming the role of Chair, Acting, Interim, or Directorships (with few exceptions), they will be assigned the appropriate salary grade of faculty/tenure elig (FTX), and their administrative role will be captured through Administrative Post.
Invalid Concurrent Job Combinations
Examples of combinations not permitted include an individual with concurrent academic and non-exempt staff position. Neither can an individual be in both the AC1 (benefit eligible) and AC2 (non-benefit eligible) salary plans concurrently, nor can they be in the AC3/AC4 (student academic) salary plan simultaneously with a AC1/AC2 salary plan.
Setting the Job Indicator Flag
The job indicator from the job table has a value of ‘Primary Job’ or ‘Secondary Job’. The job with a job indicator value of ‘Primary Job’ is used for benefits administration to identify the benefits program of the employee, for benefit deductions, payroll distribution, campus location, and for reporting purposes. A warning rather than an error is displayed when more than one primary job exists for an individual. Multiple primary jobs will occur for brief periods of time until a former primary job is changed to be a secondary job; however, an employee must have only one primary job prior to benefits administration and payroll processes running nightly. Only final approvers will be allowed to change the job indicator value.
The job indicator is automatically set to ‘P’ (primary) for a first hire. For subsequent hires into additional jobs, the job indicator is set to ‘S’ (secondary). Final central office approvers will have the responsibility to review and reset the job indicator as necessary when approving hires in the context of multiple jobs. For the conventions used in setting the job indicator for transactions by final approvers in AcadHR and Payroll offices refer to the table above.
When appropriate, the AcadHR or Payroll office changes the job indicator value on the Hire E-Doc to ‘P’ as part of the approval process. The final approver using the Job Data Change E-Doc with the reason of Change Job Indicator should complete the change to the current primary job row immediately. It is vital that both transactions are completed during one setting. The job indicator is a key factor to benefits and payroll administration.
8. Select Hire and the Hire: Job screen appears.
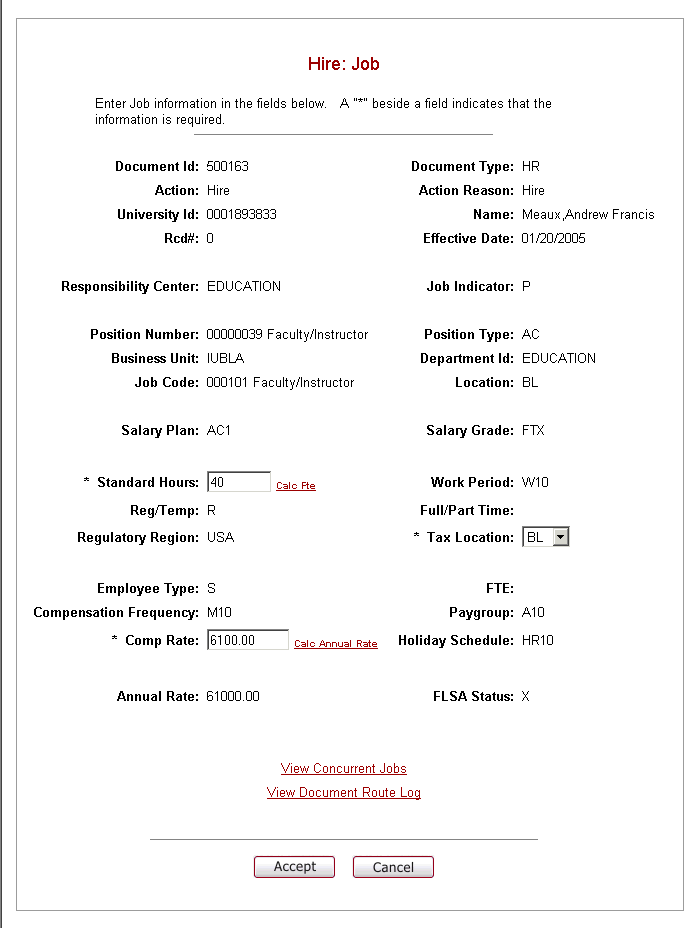
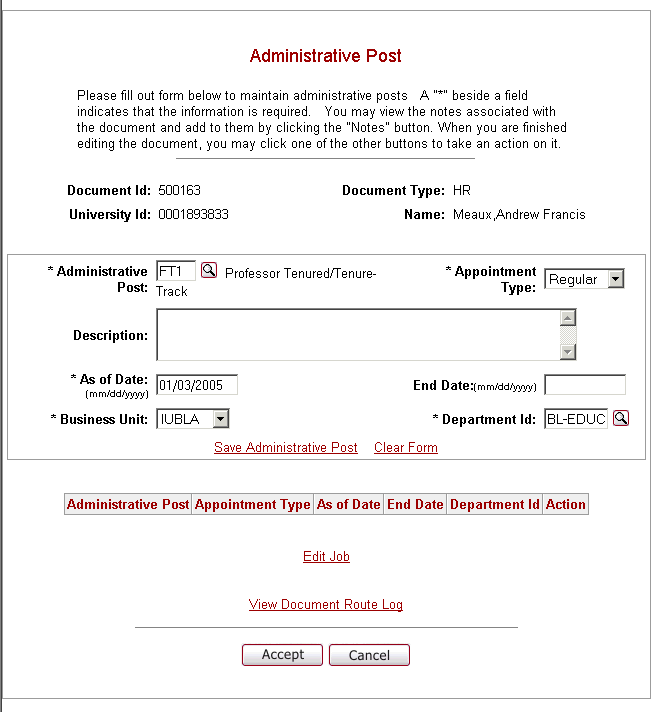
9. Complete the Standard Hours, and Compensation Rate. Select Accept and you will see the Administrative Post screen.
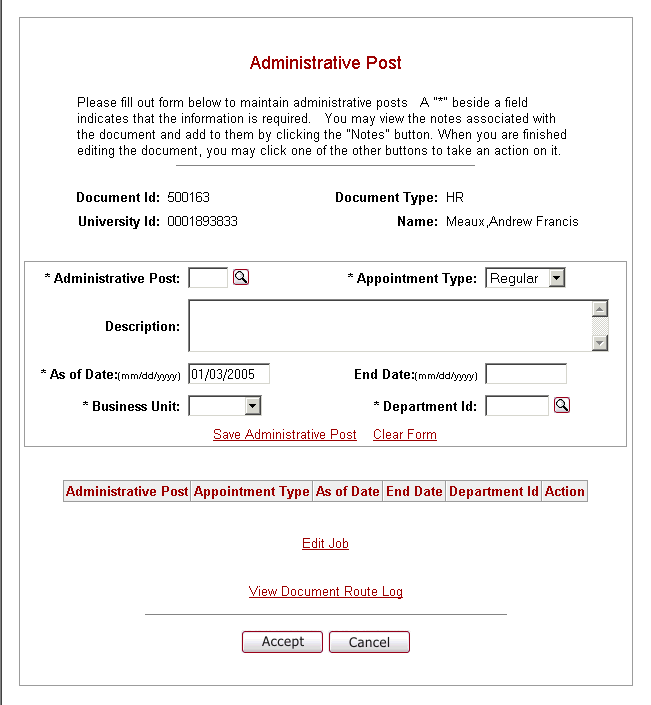
10. Complete the required fields.
Administrative Post: If you know the Administrative Post code enter it in the field. If you do not know the code click on the lookup icon.
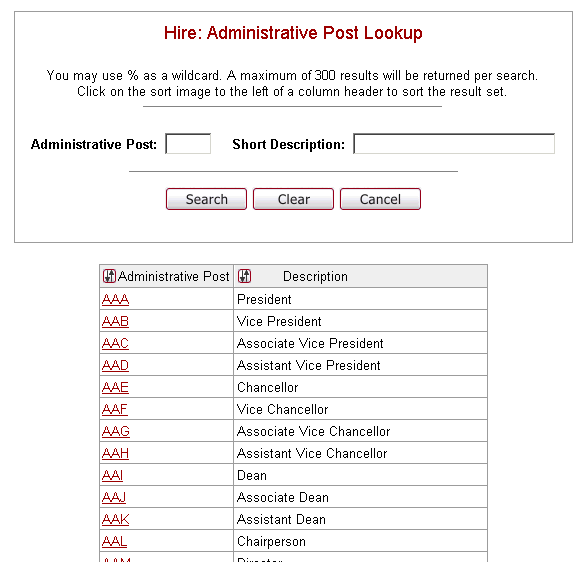
Once you have located the Administrative Post, click on the Administrative Post code.
The Appointment Type will default Regular, which is the appropriate selection for this position since the employee will be receiving pay from IU.
Enter the effective date in the As of Date field and include an End Date if applicable.
Select the business unit from the drop down.
Insert the Department ID, or select from the lookup icon .
The standardized Administrative Post description will default in. In some cases, it will be necessary to provide an expansion of the title in the description field, i.e., default administrative post is Director and description is completed to define role within the department such as Graduate Studies.
Note: The Short Description and Description will be used to identify official title for publications.
The following is a completed page:
11. Once you have completed the Administrative Post, click the Save Administrative Post. Your Administrative Post (title) will be returned to the bottom of the page.
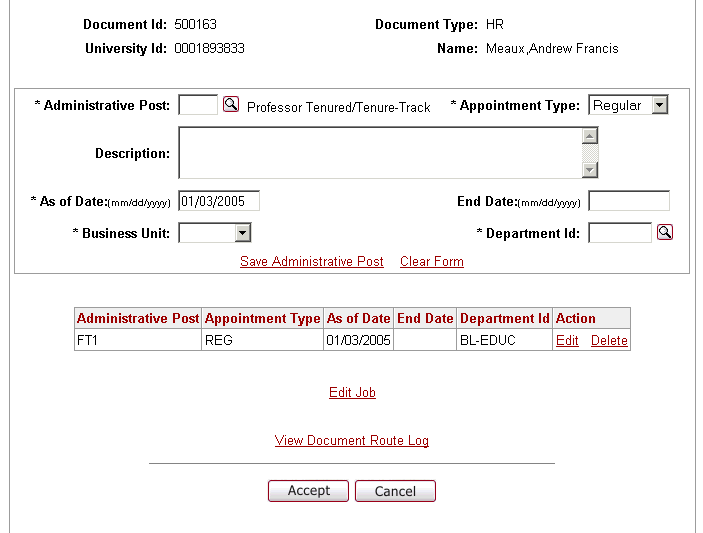
12. You will have the option to Edit or Delete your entry. When finalized, select Accept and the Hire Job Funding page appears.
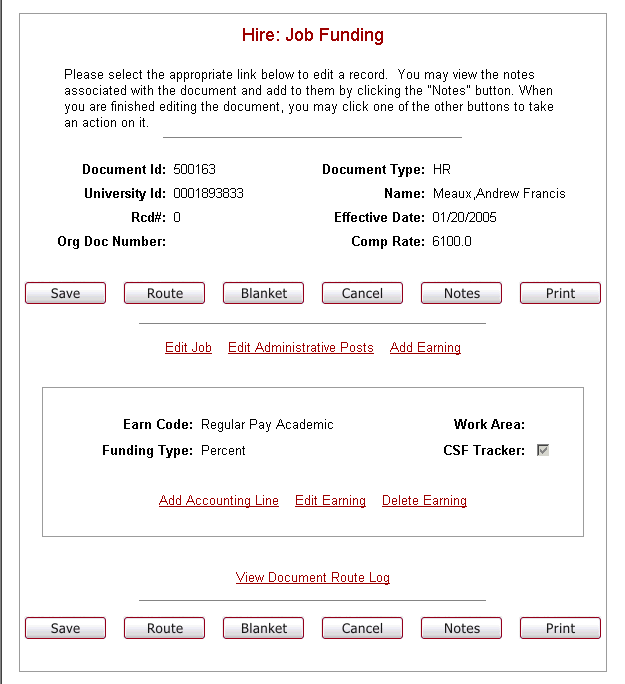
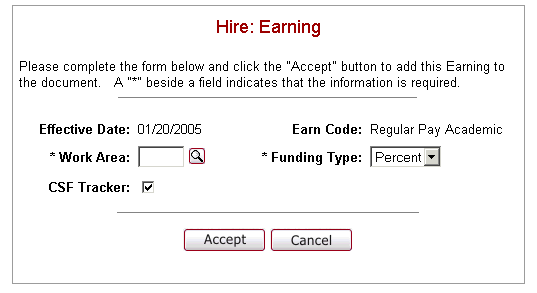
13. Add the Work Area by clicking Edit Earning. The Work Area identifies the payroll voucher flow. Enter the number or use the lookup as needed (see example below).
Lookup Example:
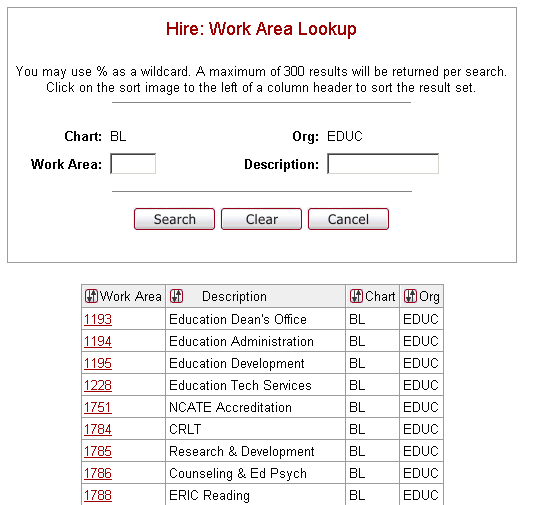
Select the desired Work Area number and the field will be populated.
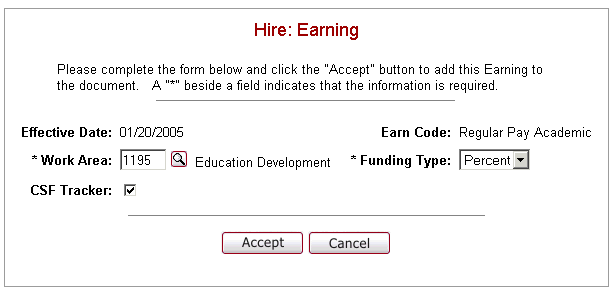
14. Funding Type will default in as percent. If this position will run through budget construction, the CSF Tracker should be checked. This will be the case for the majority of AC1 hires. However, some AC1 jobs will not be processed through the CFS tracker, i.e., Postdoctoral Fellows. When completed, Select Accept and you will return to the Job Funding page with the Work Area completed.
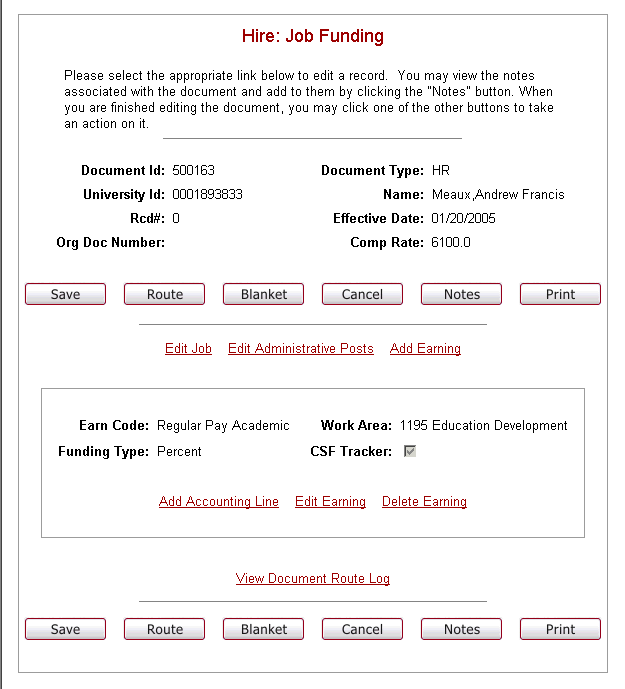
15. Click Add Accounting Line and the Hire: Accounting Line screen will appear.
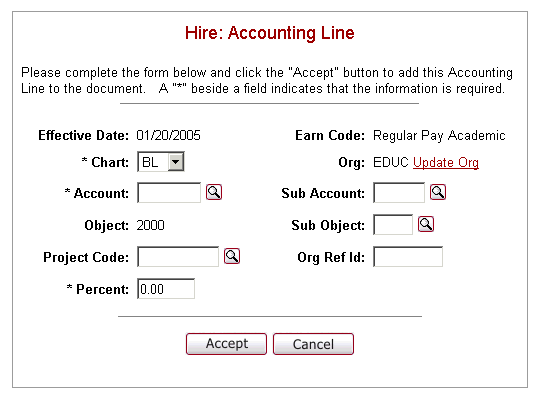
16. Complete the required fields.
- The Chart will default BL. If you need to make a different selection use the drop down.
- Insert the Account, or select from the lookup icon .
- If
you have a Sub Account you can enter it, or click on the lookup icon to
locate the Sub Account.
If you enter a Sub Account, you will also enter the Sub Object, or click on the lookup icon to locate the Sub Object code.
- The Project Code is an optional accounting key field that allows you to track expenses even if they are entered on a different campus, org, or account. If you know the Project Code you enter it or click on the lookup icon to locate the Project Code.
- Enter the Percent of the salary that is going to be charged to this account, i.e., job is 20 standard hours paid from one account would reflect 100% of earnings to be charged to this account.
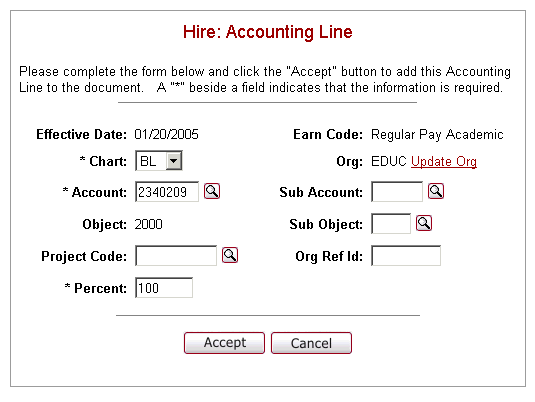
17. When the Accounting Information is correct, click Accept and you will see the Job Funding page completed.
If you will be using multiple accounts, click Add Accounting Line and repeat the previous instructions. The total percentage of all accounts combined must equal 100%.
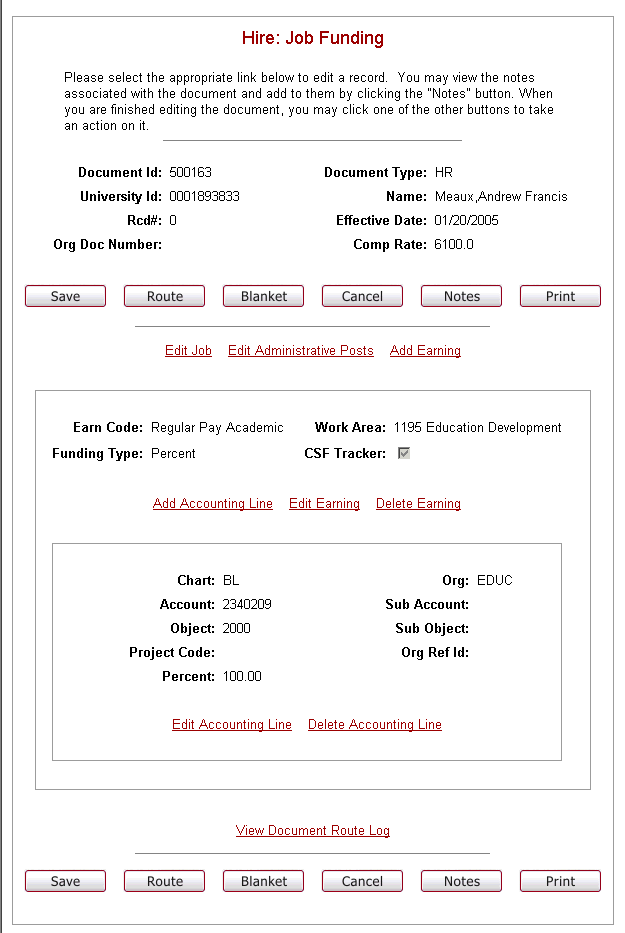
18. Review Job Funding, and if correct, click on the appropriate action button(s) below. If not, click Edit Earning or Edit Accounting Line and correct as needed.

SAVE = this action Saves to your Action List in order for you to retrieve it at a later time to complete it.
ROUTE = select when you have completed the E-Doc and are ready to automatically route the document where it will be approved and eventually saved to PeopleSoft.
CANCEL = cancels the entire E-Doc. It will be necessary to begin over.
NOTES = initiators and approvers can add notes to the electronic document as it is being routed through the approval process. Notes should be used for providing details about the transaction being routed. Notes are only available to initiators and users who are part of the routing process. They are not saved in PeopleSoft but are stored within the E-doc database.
PRINT = allows the initiator and any document approver to print the doc.
The File download box should appear. It will give you the option to either open the file or save it to your Desktop. You should always open the file, unless you get an error indicating that the file will not open, then you must save it.
When you open the file, the completed document should open in Adobe Acrobat.
If it is necessary to save the file, you will need to go to your Desktop and double-click on the Acrobat file icon for the E-Doc file that you just completed. The E-Doc can then be printed; however, after it is printed, you should delete the file from your Desktop. The E-Doc may contain personal information that should not be stored on your computer.
To print the E-Doc, click on the Print icon in the Adobe Reader Toolbar.
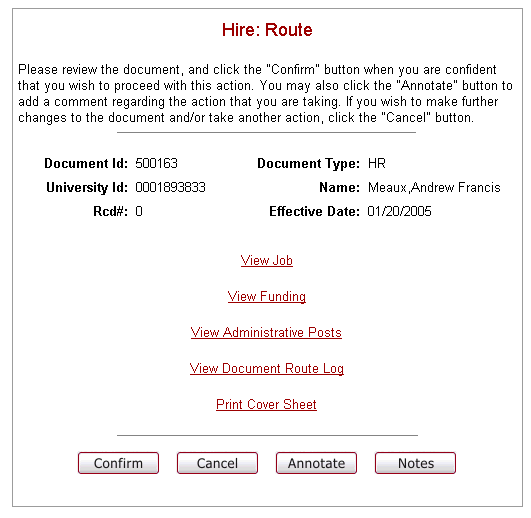
19. Click Route to send the E-Doc to be approved and the following screen will appear. (You may have done this in the previous step.)
Annotate - Annotate should be used for information related to processing of the E-doc. This field is helpful for approvers to prioritize activities, especially for those with large action lists. Annotations are available for viewing in the route log that is accessible during document search and on the action list. Due to the fact that route logs are available to all users through the document search, confidential information should not be entered in this field. Some examples of phrases that may appear in the annotation:
- Please process immediately
- Urgent
- Disapproved
20. Click Print Cover Sheet and check all of the pertinent documents that you will be sending to the central office. Print this document (File, Print on your browser, or use the Print icon). Send the cover sheet and documents to the address indicated on the Cover Sheet. Once you have printed the cover sheet, click the X on your browser and it will return you to the Document Confirmation page.

21. Click Confirm and you will be notified that you have routed the E-Doc successfully.
22. Click Close to close the Document Confirmation window.
Review the Workflow Overview.
Once the document is routed, you can perform a Document Search to see where the E-Doc currently is.
NOTE: A note will automatically be attached when the document is routed showing the current PeopleSoft value and what the value has changed to in the E-doc. This happens after the document is routed.